WTF do I do with kohlrabi, and other veg box questions

I recently signed up to a fortnightly veg box scheme, in an attempt to try to force a bit of planning into our day-to-day lives. After all, they email you in advance to tell you what’s coming ‘fresh from the fields’ that week, so we’ve got four days to plan out what we’re going to do with all this hyper-fresh produce before it rots into a sludgy brown mess in the bottom of the fridge, right?

Hmmm…kohlrabi with veg box

Well rot it will, unless you get cooking quickly with one of these boxes. Actually I’ve not had any real problems with our current supplier so far, but it’s taken me a long time to jump back on the veg box bandwagon, as other schemes I’ve tried routinely landed me with a whole box that had a (fridge) shelf-life of maybe 3 days at most. I’m sure organic super-fans would jump in here and point out that this proves what evil things must be done to most of the fruit and veg available to us through more prosaic, shop-based shopping, but frankly, I’m a modern working gal, and I quite like a bit of shelf life in my produce. It’s nice to know that the spinach you’d intended for tonight’s dinner will still be useable for tomorrow because you’ve had to work late and can’t be shagged with cooking, or your best friend called with a crisis and suddenly it’s takeaway night because only a pizza will cure that hole in her heart left by that Spanish stud she met on holiday and who just won’t commit, dammit.

Apart from a growing colony of butternut squashes at the back of our fridge which I’m hoping will be keeping us replete in dietary fibre and vitamin A long after the apocalypse has come (as the most long-lasting vegetable in any box it’s always lowest on the cooking-priority list and has yet to be cooked before the next box arrives) we’re doing okay. Key so far has been the tactic of just doing dishes we’d normally cook and throw three extra veg in. This has the added benefit that we need less meat on the plate too, although I’m starting the think we should take out shares in bacon producers, as I’m yet to find a veg that doesn’t taste great just fried with a bit of bacon and then tossed through spaghetti if supper simply has to be a 15 minute affair. Except one that is.

KOHLRABI

It’s the demon of the veg box, it really is. A quick flick through my ample supply of cookbooks shows an endless procession of stir fries and coleslaw-type salads. Pfft. It doesn’t stir-fry as well as pak choi and it makes a more watery and insipid slaw than any other cabbage. I can’t help but wonder if kohlrabi isn’t the veg grower’s equivalent of the Emperor’s new clothes. Somewhere there’s a cabbage farmer pissing himself with laughter that we all fell for this pointless foodstuff.

But I shall persevere. The latest veg box has broad beans which will go into a variation of Hugh Fearnley-Whittingstall’s broad beans on toast. True spinach will bulk out a spicy curry made with lamb shoulder fillets and a minestrone will use up almost everything else and can be our working lunch for several days. And Mr Kohlrabi? One of my cookbooks from the 70s advocates boiling it before stuffing and baking it. I’m going to give it a whirl, although I might not boil it for the full 30 minutes recommended in the recipe. Vitamins? What vitamins?

Luxury pork pie with orchard jelly

Pork pie is my father’s desert-island dish, something he’d eat every day given a chance, so for most of my adult life I’ve baked him one every year instead of a birthday cake, which he does his best to keep to himself, fending off the predations of my mother and sister (and me!). This recipe has been slowly developed for him over the years, to the point where I feel confident in saying it really is the ultimate.

Luxury pork pie with orchard jelly
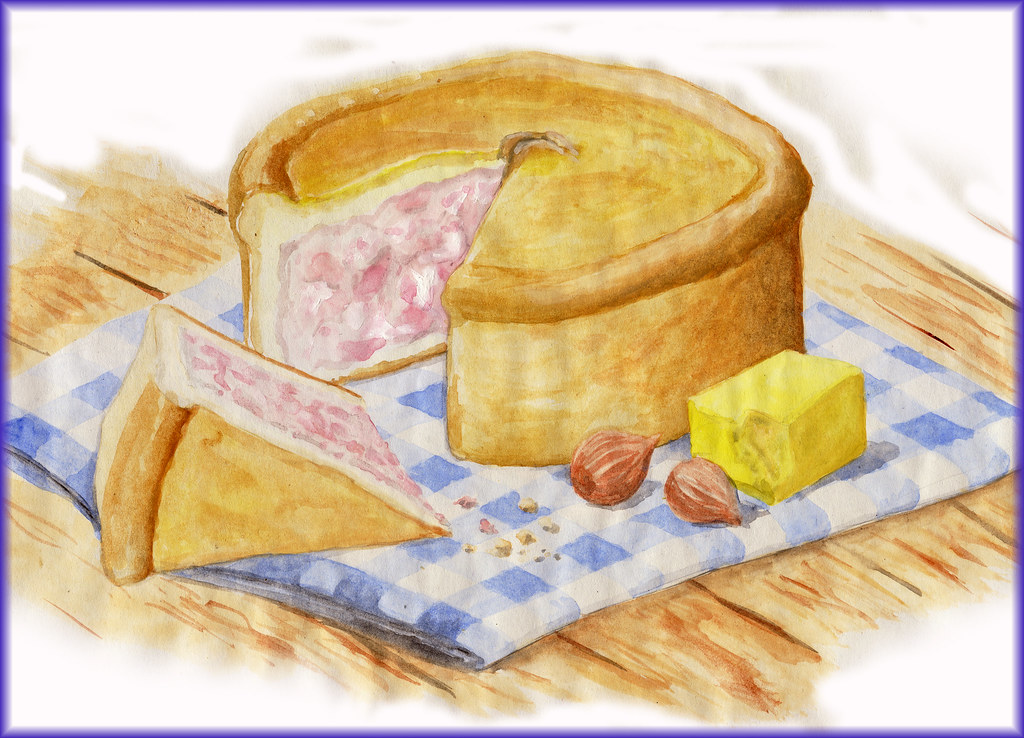
Unlike traditional pastry made with lard, this souped-up hot water crust dough uses the fat from the magnificent Iberico pig, which you can get from certain posh food retailers these days. It is super-soft, so really needs the overnight chilling to firm it up, and I prefer to crimp my pastry after chilling, so you get a neater finish. Spend time making sure the seal is right, smearing edges with a damp finger if necessary, as any cracks will let precious juices seep out. The stock recipe makes twice what you need but can’t really be made in a smaller batch, freeze the rest for another pie or use it to make a fabulous pea & ham soup.

Luxury pork pie with orchard jelly
Makes 1 large pie

For the hot water crust pastry:
600g plain flour
1 tsp fine salt
100g Iberico pork fat
100g unsalted butter
3 medium eggs (2 for the dough, 1 to glaze)

For the jellied ‘orchard’ stock:
1 full pork trotter (all the way up to the elbow) or 2 small feet, split (get your butcher to do this)
2 apples, roughly chopped
1 large white onion, roughly chopped
2 sprigs of sage
1 fresh bay leaf
500ml medium dry cider e.g. Aspall’s
500ml fresh chicken stock (homemade or from a tub in the chiller cabinet)*

For the pie filling:
1 tsp sea salt
1 tsp white peppercorns
750g skinless pork shoulder, cut into 5mm-1cm dice
250g skinless pork belly, minced
250g smoked streaky bacon, finely diced
16 sage leaves, finely shredded
1 tsp ground mace
½ tsp cayenne pepper

You will also need a 20cm round springform cake tin, base lined with greaseproof paper

Start with the pastry. Put the flour and salt in a large mixing bowl and make a well in the centre. Put the two fats in a small saucepan with 200ml water and put on a low heat just until the fats melt (do not let it boil or you will drive off too much moisture). Pour the fat and water mix into the well in the flour and stir in, gradually incorporating the flour into the liquids. Lightly beat 2 of the eggs then add to the bowl and mix just until you have a cohesive dough. Don’t mix more than necessary otherwise you’ll activate the gluten which will make the pastry tough. Separate out a quarter of the dough for the lid. Shape both large and small balls of dough into flattish discs, wrap each in clingfilm and chill for an hour until firm enough to roll out.

To make the jellied stock, put everything into a tightly fitting saucepan and add just enough water to cover. Cover with a lid, bring to the boil, then reduce the heat to the lowest flame possible and simmer very gently for 4 hours. Strain through muslin for a really clear stock and chill until needed.

For the filling, crush the white peppercorns and sea salt in a mortar and pestle to a fine powder. Combine all the filling ingredients with a really generous grinding of black pepper and mix really well with your hands. At this stage it’s a good idea to fry a spoonful of the mixture off in a small pan and taste to check you like the seasoning.

On a floured worktop roll the large ball of pastry out to a large circle big enough to fill the tin on the base and all the way up the sides. Put the rolled out dough in the cake tin and smooth it up the sides, pressing it into shape with your fingers and making sure there are no gaps or thin patches. Fill the pie with the pork filling. Try and keep the filling nice and loose, don’t pack it down or there’ll be no space for jelly. Run a wet finger around the top edge of the pastry. Roll out the top section pastry to a 23cm circle and place on top the pie, pressing gently at the edges to seal. Loosely cover with clingfilm and chill overnight.

The next morning preheat your oven to Gas 4/180°C. Cut a small cross in the middle of the pie lid and fold the edges back to make a steamhole. Crimp the edges of the pie with your fingers, ensuring you have a really good seal. Lightly beat the remaining egg and brush over the top – don’t discard the remaining egg just yet. Put the pie on a baking sheet and bake for 45 mins. Reduce the heat to Gas 3/160°C and cook for a further 1 hour 15 mins. Carefully release and remove the springform tin (use a cloth to protect your hands), brush the sides with egg wash and return to the oven for a final 15 mins. Allow to pie to cool slightly before filling with jelly.

Reheat 250-300ml of the jellied pork stock until piping hot. Place a small funnel or piping nozzle in the steam hole of the pie and gradually add the stock. Do it slowly and carefully, you will need to lift and tilt the pie periodically to evenly distribute the stock. When you absolutely cannot get any more stock into the pie let it cool completely. The pie is best served at room temperature, but if you’re not eating it at once you’ll need to pop it in the fridge once it’s cool.

*I make my own fresh chicken stock cubes by making a batch of stock from a roast chicken carcass and boiling it down until you’ve got a thick sticky reduction, then freeze it in ice cube trays. Two reduced stock cubes like this is enough for the stock here. If you don’t have, or can’t get, fresh stock don’t use regular stock cubes as their distinctive taste will mar the other flavours, plain water is a better bet.

Cookbook review: Valentine Warner’s What To Eat Next

For a man who can hardly be described as having courted 
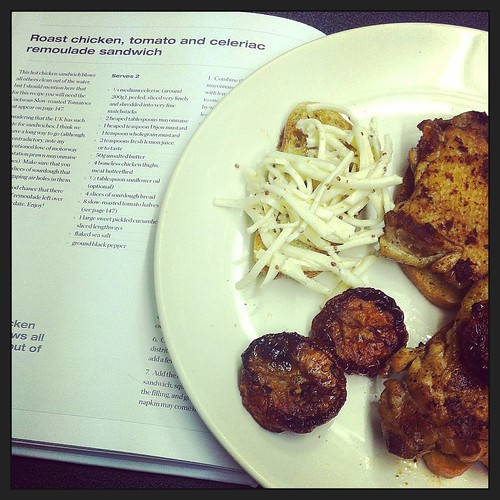
controversy – he doesn’t swear obnoxiously a la Gordon,  have high-profile relationship dramas like John Burton-Race, or even campaign aggressively as Hugh does –  Valentine Warner seems to incite quite strong love/loathe feelings amongst cookbook readers. Personally I like his ethos (globetrotting but with British ingredient passion), but not so much the personality (bit of class war chippyness on my part). He’s certainly not a man I’d pull off a shelf for the love of his face, so I’m baffled by the choice of a cover with a picture of the man licking crabby fingers as if he’s the Y chromosome’s answer to Nigella, but I know a lot of women of a certain age who’d disagree with me.

5 things you should know about this book

  1. Men are from mars, women are from the photography studio. When it comes to cookbooks, men really don’t seem as visually led as women. Every woman I know complains about lack of pictures with recipes, but when given free rein my (artist) husband instantly picked a dish with no picture. Which really needed a picture. Everyone knows what a quiche looks like, can easily visualise a tomato and basil tart. It’s the things you haven’t seen before that really need photographic help.
  2. Teach yourself. Valentine’s not a cook who’s going to hold your hand and baby you through things – if a recipe needs a chicken thigh skin-on, deboned and butterflied he expects you to know how to do that. Or at least how to look it up on t’internet. Sheesh c’mon, he’s not your momma!
  3. 2 is the magic number. We don’t all live with spouse, rover and 2.4 children. It’s refreshing to have a cookbook where most recipes serve just a deuce.
  4. Lady Fwahfar told me….If waffling name, event and connection-dropping annoy you (as they do me), don’t read the intros. I’m not sure why authors feel we need to know that a recipe was inspired by a trip to the Algarve on a rainy Tuesday in 1964 with Tom Ford and his dog Bessy. It’s probably done to add ‘personality’.
  5. Flautas make a cracking breakfast, cold from the fridge with salsa and sour cream. In fact, thanks to the punchy flavours Valentine is so fond of, a huge number of the recipes from this book are just as fantastic cold the next day, or perhaps at midnight by the light of the fridge door. Maybe he is the male Nigella after all….

3 recipes I tried that you should too

Roast chicken, tomato and celeriac remoulade sandwichRoast chicken, tomato and celeriac remoulade sandwich
Crispy skin, tangy intense tomatoes, rich remoulade, all piled on thick sourdough – what’s not to love?

Finger-licking shrimpsFinger-licking shrimps
I’m not usually a fan of tomatoey sauces on prawns, but the smokey chipotle flavour of this was  real winner, and has a much milder flavour than my usual firecracker prawns so won’t scare the chilli-phobes.

Chorizo and potato flautasChorizo and potato flautas
Cooked potato and chorizo stuffed in a corn tortilla and fried. Move over faijita, it’s time for the flauta to take over, especially on cold, grey days.

The scores

Take to bed-ness: Is it gorgeous? Informative? Do you want to curl up in bed with it?
7/10

Marigold rating: Do the recipes create mountains of washing up? Do you suspect a team of sous chefs were behind this? Does a home cook, ultimately, stand a chance?
6/10

Mothball-ability: Is it, despite all appearances, going to sit on the shelf gathering dust?
8/10, it’s been in regular use in my kitchen ever since I got it, definitely not one for the back of the cupboard.

Other recipes that caught my eye

Spicy cracked crab claws; Weekend breakfast anchovy & parmesan baked eggs; Beetroot salad with blackcurrant; Asparagus cigars; Pommes aligot; Grilled quails with almond mayonnaise.

Dinner à deux: Coconut spiced mussels with toasted herby naan

Mussels are the perfect supper for two. Prepare any more than a kilo and you may well lose the will to live, but enough for you and your loved one is just enough graft to make you feel smugly satisfied whilst still leaving you plenty of time to snuggle on the sofa in post-dinner bliss. Sweet shellfish pairs brilliantly with creamy Indian curry flavours and tangy lime plus of course shellfish, chilli and garlic have all been reputed as aphrodisiacs at some point in the past (probably by those horny old Romans), so what more excuse do you need to whip up this simple supper for your Valentine?

Coconut spiced mussels with toasted herby naanCoconut spiced mussels with toasted herby naan
Serves 2

1kg mussels
2 tbsp olive oil
3 shallots
2 tbsp Balti curry paste
400ml coconut milk
juice of 1 lime
2 garlic cloves
1 green chilli
A small handful of coriander
1 naan bread

1. Rinse the mussels in cold water, removing any beards and barnacles, and discard any open ones that don’t close when given a sharp tap (this means they’re already dead). Leave in a sinkful of clean cold water until needed. Preheat the oven or grill to high.

2. Peel and finely slice the shallots. Heat 1 tbsp oil in a large deep saucepan. Add the shallots and fry for 2-3 minutes or until golden at the edges, stirring occasionally. Stir in the curry paste and cook for a further minute.

3. Pour the coconut milk into the pan, increase the heat to high, and bring to a rapid simmer. Drain the mussels in a colander and tip into the pan. Stir the mussels to coat them in the cooking liquid then cover with a tight-fitting lid. Cook over a medium heat for 5-7 minutes or until all the mussels have opened (discard any that haven’t).

4. Meanwhile crush the garlic and finely chop the green chilli (if you prefer it milder, de-seed the chilli first) and half the coriander. Mix with 1 tbsp olive oil and a pinch of salt in a small bowl. Spread onto the naan bread and grill or bake for 2-3 mins, then cut into wedges.

5. Stir the lime juice into the mussels, then ladle everything into deep bowls. Scatter with the remaining coriander leaves (discard the stalks) and serve with the hot naan wedges on the side.

6. To eat, pick the mussels one by one from the shells, scooping up the delicious sauce as you go and mop everything up with the spicy naans.

Orange-baked chicken thighs with perfumed rice and nutty broccoli

Not your everyday chicken and rice, once you tasted both cooked in freshly-squeezed orange juice you’ll wonder why you never tried it like that before (at least, that’s what my friends said when I did this dish for them!). When I was growing up mum regularly used to roast me chicken breasts with fresh orange, an idea she got from a recipe in a battered old Marguerite Patten book called ‘Five hundred recipes for chicken dishes’, and this is a great way to jazz up a very simple midweek supper.

sketch1381095206007

Orange-baked chicken thighs with perfumed rice and nutty broccoli
Serves 2

2 large chicken thighs, bone-in and skin-on
40g butter
3 large oranges
½ a chicken stock cube (a good one please – Kallo Organic for preference)
5 cardamom pods
125g basmati rice
1 small head of broccoli
20g flaked almonds

1. Preheat the oven to 220°C. Pat the chicken dry with kitchen towel and place skin-side up in a small roasting dish.

2. Squeeze the juice from 1 orange and pour over the chicken into the roasting tin. Season the chicken generously with salt and pepper (particularly with pepper) and dot with half the butter. Bake for 30-40mins or until golden brown and cooked through.

3. Meanwhile, juice the remaining oranges and make up to 250ml with water. Bruise the cardamom pods with the flat of a knife. Place the rice in a medium saucepan, add the diluted juice, crumbled stock cube and cardamom pods and cover with a tight fitting lid. Separate the broccoli into florets and set both rice and broccoli to one side.

4. 20 mins before the chicken is done bring the rice to a boil on a medium heat, stir once with a fork, then re-cover and simmer on a low heat for 10-12 minutes until cooked through.

5. Bring a saucepan of salted water to the boil and cook the broccoli for 3-5 mins until tender. Drain the broccoli and return the empty pan to the heat. Add the flaked almonds and cook on a medium heat, shaking regularly, for 1-2 mins until golden. Add the butter, allow to melt, then add the broccoli and mix together.

6. Serve the baked chicken with the cooked rice (don’t eat the cardamom pods), the broccoli, and the juices from the roasting dish spooned all over.

Meat-free Mondays: Beetroot rosti with feta and tahini-lemon dressing

Beetroot doesn’t have to take ages to cook, these rostis are done in mere minutes, and pairing them with the salty feta really shows off their earthy sweetness

sketch1381096584613Beetroot rosti with feta and tahini-lemon dressing
Serves 2

2 medium beetroot
1 medium floury potato
1 small white onion
1½ tbsp plain flour
1 tsp ground cumin
2½ tbsp olive oil
50g tahini
1 small garlic clove
2 small lemons
2 handfuls baby spinach leaves
100g feta cheese

1. Peel the beetroot and potato and coarsely grate. Place in a colander in the sink and squeeze out any excess moisture, then transfer to a bowl.

2. Peel, halve, and finely slice the onion, and crumble the feta cheese. Add the sliced onion to the grated beetroot and potato along with the flour, ground cumin, and half the feta. Season with salt and pepper and stir until well mixed.

3. Place a large frying pan on a medium heat and add 1 tbsp olive oil. Divide the beetroot mixture into four balls. Squeeze each ball tightly in your hands to bind it together and place evenly spaced apart in the frying pan.

4. Use the back of a spatula to flatten the balls gently into rostis approximately 1cm thick. Fry for 3-4 mins on each side, until tender and well browned, turning just once (be gentle, you don’t want them to break up!).

5. Meanwhile, finely grate the zest from the lemons, then juice them (keep zest and juice
separate). Crush the garlic clove and, in a small bowl or jug, whisk together with the tahini, lemon juice, 1½ tbsp olive oil and freshly ground black pepper to taste.

6. Arrange the spinach leaves on plates, and toss with the lemon zest and remaining feta. Transfer the cooked rosti to the plates and drizzle over the tahini dressing.
Continue reading “Meat-free Mondays: Beetroot rosti with feta and tahini-lemon dressing”

Pumpkin Amaretti Ravioli

Pumpkin Amaretti RavioliHallowe’en, All Hallow’s Eve, Samhain….whatever you call it, it spells PUMPKINS, carved ones to be precise (or as the Americans call them – Jack O’Lanterns). There are many subtle variants to the legend of why precisely we carve ghoulish faces into squashes at this time of year (apparently the Irish traditionally use turnips or swedes instead) but ultimately the idea is to scare bad spirits away. Seems sensible enough to me, and I always loved the slightly gory feel of tearing out massive handfuls of fibre and seed from the pumpkin’s interior!

Many many years ago (2005 to be precise), when blogging was still quite niche rather than the first resort of any self-confessed ‘foodie’, Elise over at Simply Recipes ran a competition for the most creative way of using up the off-cuts from the pumpkin carving, and I won! With this picture no less:

Yes, really; hard to imagine that winning now isn’t it? These were the days before every blogger taken seriously had a digital SLR, home studio and props cupboard!

Anyhoo, as you can see from the first photo, I’ve reshot (though it’s still nothing Foodgawker or Tastespotting would consider acceptable), and have tweaked the recipe a bit over the years, omitting the pumpkin seeds (I like to dry-fry them with salt & chilli and serve them as pre-dinner snacks), and replacing the creamy sauce with a simpler sage butter and some fried amaretti breadcrumbs. So here at long last is my reprise of my favourite Hallowe’en recipe, reinvented for 2013….

Read on for the recipe…

Pulled pork and fried mac cheese burgers

The advent of the American street food revolution in the UK has made me very very happy. Not to mention much poorer, several pounds heavier, and in all probability with blood that resembles spicy cottage cheese. Even their salads are bad for you. No seriously, have you ever actually ordered a Cobb salad?

Pulled pork & deep fried mac cheese burger

There are days I think I could – and do – just live on hot wings, waffles and chili. There’s a lot of debate about who does the genre best, but for me it absolutely has to be Pitt Cue Co. From the day they set up their trailer on the Southbank they had me hook, line and sinker, and the pulled pork and deep fried mac cheese burger was the first dish of theirs I ever tasted. Spicy, juicy pork, tangy crunchy slaw, and crisply-crumbed but oozy-centred mac cheese all sandwiched within a sweet bun. Who could ask for more?

This is my version. The ingredients list is long, but really, it’s just some roast meat, a spot of sauce and a slice of pasta bake – really not all that difficult, when you think about it.

Pulled pork and fried mac cheese burgers
Makes 6 hefty burgers

You will need:
6 handfuls slow-roast pork  (I roast a 2kg shoulder at Gas 2 for 5 hrs 45mins, it gives you more than you need but hey, too much pork is never a problem, right?)
6 large brioche or ciabatta rolls
A portion of your favourite slaw recipe – I like to use red cabbage for both colour and its extra crunch

For the fried mac cheese:
225g macaroni
350ml whole milk
½ white onion
4 cloves
2 bay leaves
30g butter
30g flour
115g Swiss or Dutch cheese (something like Gruyère, Emmenthal or Maasdam)
15g Parmesan, finely grated
1 tbsp Dijon mustard
nutmeg, to taste
plain flour, beaten egg and breadcrumbs for coating

For the pulled pork sauce:
1 x 6g Ancho Poblano*
15g Pasilla chilli*
15g Cacabel chilli*
1 tsp cumin seeds
2 cloves
1 scotch bonnet
3 garlic cloves
1 tsp dried oregano
1 tsp vegetable bouillon powder
2 tbsp palm sugar
250g red onion
juice of 2 oranges
3 tbsp red wine vinegar
5 tbsp tomato puree
Read on for the recipe…

Come join the party – Flavors of the USA!

WordItOut-Word-cloud-271604

“American foods” Word cloud made with WordItOut

We are now on our culinary journey to USA in the “Flavors of…Series 4” blogger event by Nayna of simply.food. As a huge Americophile myself (at least where the food is concerned) I’m really pleased to announce that I’m the host for this latest blogger challenge, and am pleased to announce I’ll be sharing my most gut-busting creation: the epic deep-fried mac cheese pulled pork burger. Please share your fantastic American-inspired creations with us all, by posting on your own blog and following the guidelines laid out below.

Flavours of USA logoHere’s some great sites to get you started:
americanfood.about.com
uktv.co.uk
101cookbooks
BBC Good Food
simplyrecipes.com
americastestkitchen.com

Rules:

  • Event runs 1st-31st October 2013
  • Multiple entries and archived entries ARE allowed, if you repost
  • Entries must include links back to both simply.food and Souperior
  • Send entries to souperior[dot]blog[at]gmail[dot]com. Please put ‘Flavors of USA’ in subject line and include (1)your name, (2) blog name, (3) post name, (4) post URL and (5)link to your original image
  • Although simply.food is a vegetarian site, Souperior is not, so both veggie and non-veggie entries are encouraged
  • Roundup will be posted on Souperior within 7 days of the event closing

Tomato essence

Tomato EssenceI was fair consumed with jealousy at the weekend when I visited my friend Abby and saw her homegrown vines heaving with luscious red fruit, which I couldn’t help comparing infavourably with the massed cordons of shiny green balls dangling from my plants right now. Alas, such is the lot of the exotic tomato grower – these rare or old varieties really do seem to take so much longer to ripen. So much so in fact, that the last two years my crop has been almost a total failure, as by the time they’re due to redden the weather has turned suddenly wintery (what happened to Autumn as a season?!) and I’ve lost half to blight and the rest get too cold and stay stubbornly green. If that happens again this year I think I’ll give up, and go back to good ol’ Gardener’s Delight like normal non-masochistic growers do.

Tomato EssenceAnyhoo, if you’re delighting in plants groaning with ripe fruit, or you’re lucky enough to frequent a market (y’know – one of those places you can get ’10 mange tout’ ) that sells seasonal bounty cheap, and you’ve never tried making Tomato Essence (also known as tomato ‘tea’, or more erroneously ‘consomme’) then now is the time. It is, as the name suggests, the pure clear essence of tomatoness. The soul and heart flavour of Solanum lycopersicum, taste of the Med and balm to the soul. No, really. Stop snorting at the back. This stuff really is worth the hyperbole.

And it’s so simple! In fact, I make it not only when I have a heap of whole fruit, but any time some barmy chef tells me in a recipe to cut out and discard the seeds and pulp – you know, the bit where the flavour is!  The cores from a standard punnet of toms won’t give you heaps of essence, but even a shotglass-full is worth the minimal effort when you realise what a punch this stuff packs.

Taste. Of. Summer.

Tomato EssenceTomato Essence
Serves: Some
So simple in fact, there are no measurements. Take the skins, cores, pulp and seeds from as many tomatoes as you have. Use the tomato flesh for something else – a salad perhaps, or a fresh tomato sauce, or maybe even oven-dried tomato ‘petals’. Chop the cores and pulp roughly with a knife. Don’t be tempted to blitz them in a processor, even with a big batch, otherwise you’ll smash bitterness from the seeds into your lovely essence. Place in a muslin-lined sieve (or a jelly bag, if you have one), shake over a little fine salt and stir briefly.  Set the sieve or jelly bag over a jug into which you’ve placed a few bruised sprigs of basil or fresh oregano, and leave to drain overnight. If you can suspend your muslin from something (a fridge rack for instance) so much the better, to get maximum ‘essence’. At no point squeeze the muslin/bag or attempt to force juice through – that will make the end result cloudy. Taste the clear essence in the jug, and add salt if needed. Serve as it is, chilled or at room temperature, perhaps garnishing with a sprig of fresh herbs, a drizzle of extra virgin olive oil, or even a few balsamic pearls.